|
"Poseidon Extreme" - 3.6GHz Intel Core 2 Extreme PC SYSTEM COOLING MODIFICATION |
|
|
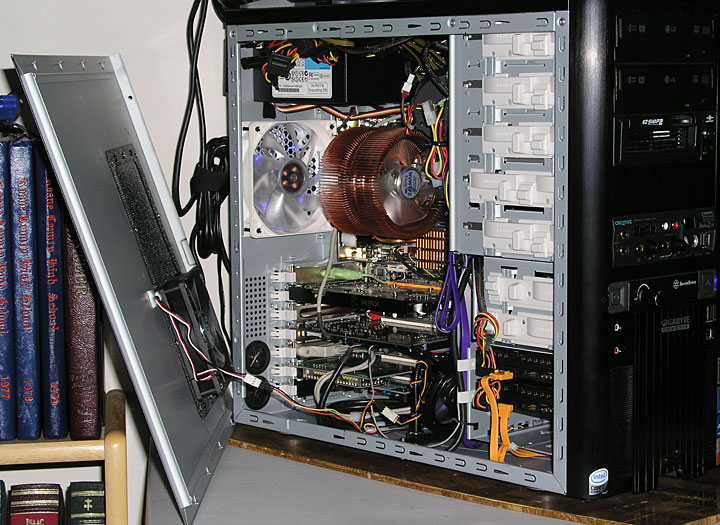
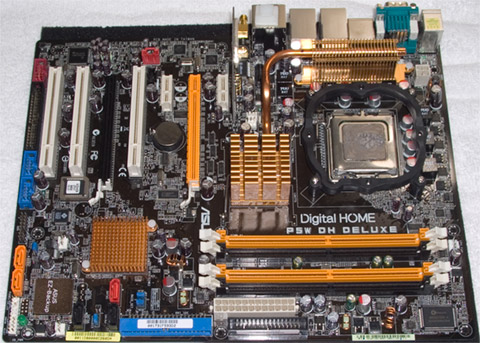
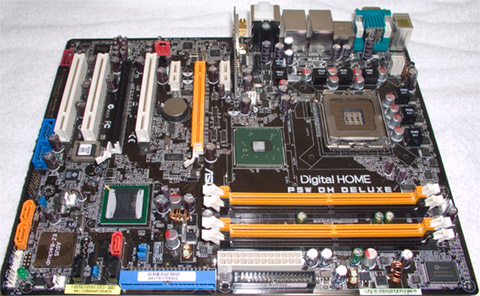
When this PC was first built, the cooling solution chosen was a Zalman CNPS9500 heatsink/fan cooler, augmented by a Gigabyte 1000 rpm quiet exhaust fan that came with the Gigabyte Poseidon case. The front case fan was another 1000 rpm quiet fan that lacked the air pressure needed to send sufficient air through the 3 hard drives mounted in the lower drive bay, so that fan was replaced by a higher-flow Silverstone fan with a fan controller. Additionally, a very quiet Enlobal fan was added to the screen on the side panel to encourage more intake air flow. |
|
|
|
|
|
Although the Zalman cooler worked well and supported stable overclocking at 3.6GHz, the fan was running at its full 2500 rpm speed most of the time, and thus was not as quiet in operation as expected. Moreover, CPU load testing at 100% using the Intel Thermal Analysis Tool revealed that the Zalman cooler could not keep the CPU cores from reaching a rather hot 82°C. While a 100% load of both cores was thought highly unlikely to occur, the goal was to achieve stable operation with full CPU loading while providing better control on the temperatures. Additionally, the system temperature was a bit warmer than desired, and the case fans were thought to be the culprit since none of the 1000 rpm fans offered a high air flow rate.
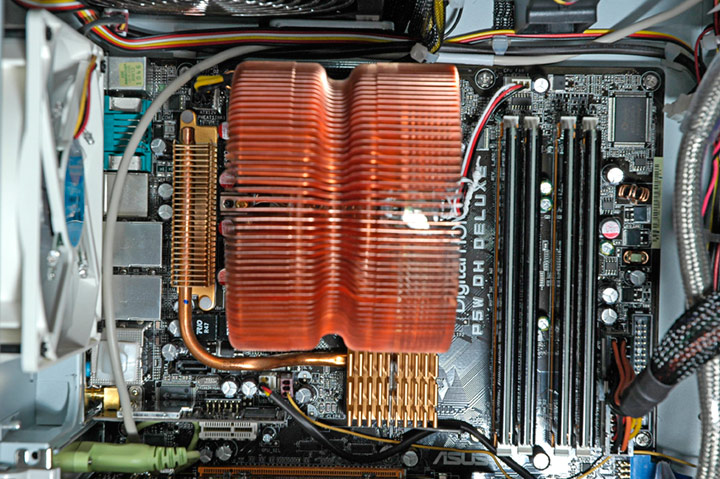
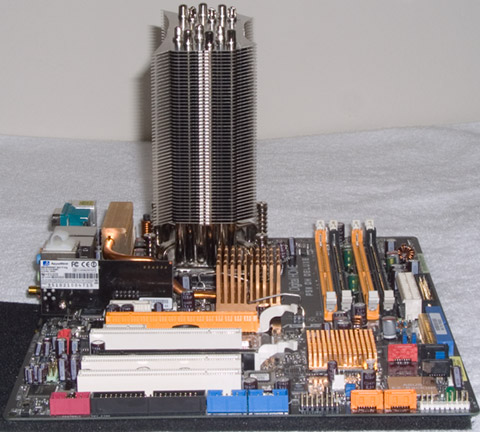
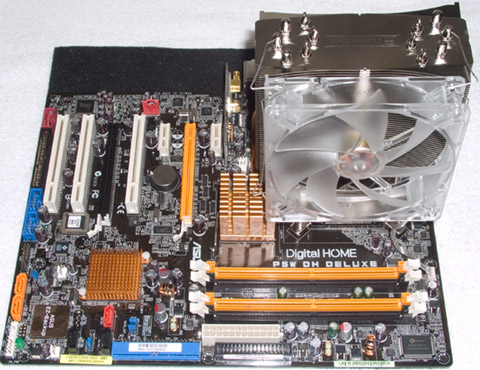
The solution: Reports on the Thermalright Ultra-120 Extreme
heatsink showed it to be highly effective, especially when paired with a
good fan. A tall beast of a heatsink at 165mm, it was just short
enough to fit inside the 200mm wide Gigabyte Poseidon chassis. The
fan chosen for the heatsink was a Silenx fan that was marketed as having
the "world's best noise to airflow ratio"; true or not, the IXP-75-14
fan was selected for its 72cfm airflow and 14 dBA noise ratings,
provided
at a mere 1400 rpm. Meanwhile, the Gigabyte
case fan on the exhaust was replaced by a higher-flow Silenx IXP-76-18
fan, rated at 90 cfm, 18 dBA, 1400rpm, and the Gigabyte fan was
moved to the side panel, replacing the Enlobal fan that was found prone
to rattling. Whether or not the Silenx fans live up
fully to their marketing hype, one thing was clear....they were superior
to the Gigabyte fan and indeed are very quiet and move copious amounts
of air. The main drawback is they are more expensive than most
fans. Here's how they look installed in the chassis. One thing I learned some time after the fact of doing this upgrade, was something I'd wondered about yet never really investigated....would that squirrel cage blower mounted above my memory have any negative impact upon the system temperature or CPU cooling? While I thought it could only improve the situation since the memory sticks do run rather hot, and some forced air should help alleviate that heat, I found that the airflow from the blower was sufficient to counteract the CPU fan's airflow. I noticed upon initial installation of the SilenX fans that they were running slower than their spec speeds, but still within the quoted tolerances. Well, at the time, I was running the blower at a quiet but still strong 2500rpm. I found that upon switching off the blower, both SilenX fans began running faster and a bit higher than spec yet still rather quiet. So, I thought perhaps I should remove the blower in favor of stronger CPU and exhaust fan performance, more quickly moving hot air out of my system. WRONG!
When I unplugged the blower and monitored the system temperatures, they
all began to rise. So, apparently the cooling of the memory must
have been keeping the overall board and air temperatures more in check
with where they should be, even if the added air turbulence from the
blower caused the SilenX fans to slow down. But, by running the
blower at a very quiet 2100rpm, I am still obtaining good airflow across
the memory while the SilenX fans are now running at spec on the CPU fan, at
1380rpm (1400rpm spec), and above spec on the exhaust at 1600rpm (1400rpm
spec). Everything is cooler and quieter...super! Now this is all
getting ahead of the game. Before I installed those fans and the
new heatsink, there was another task to tackle... |
|
 |
If the trouble was being taken to
replace an existing CPU cooler to improve on the cooling solution, why
not take it a step farther and also tweak the motherboard to have better
thermal performance? The key areas for attention are the heatsinks
on the northbridge and soutbridge. Pushing out the retaining pins
from the underside of the motherboard, both heatsinks were removed
with little effort. Removal of the heatsinks showed that a much better application of thermal grease was warranted for the southbridge at least while the northbridge's smaller surface seemed evenly coated with thermal paste of unknown quality. Using Artic Silver Thermal Material Remover to remove the old thermal paste from the CPU and chipset surfaces, a final cleaning of their surfaces was performed with Artic Silver Thermal Surface Purifier. These products worked very well and made this task easy, along with a good handful of cotton swaps and lint-free tissue. Once cleaned, all thermal surfaces were prepared with Artic Silver 5 thermal paste, using a razor blade to spread the paste evenly and covering the full surface of the affected chips. |
 |
|
 |
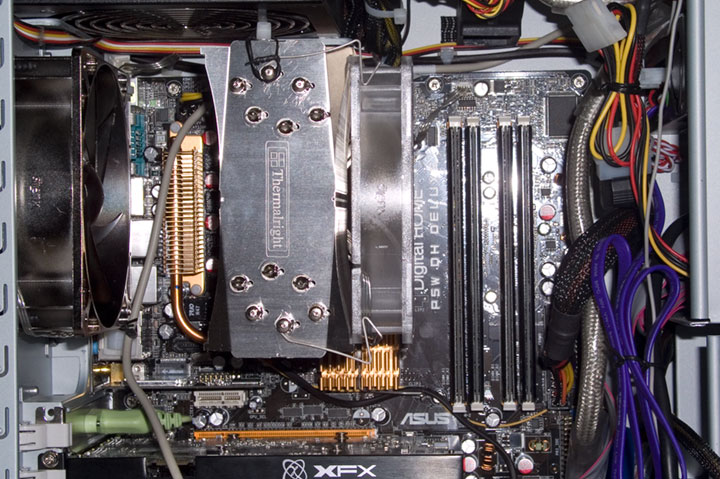
With the motherboard prepped and
heatsinks reattached, the final step was to install the Thermalright
Ultra-120 Extreme heatink and attach the Silenx fan. The heatsink
is heavy, at nearly 1.75 pounds excluding the fan, but the backplate for
the motherboard provides a strong support so that flex of the
motherboard is avoided. Still, there could be a question of
whether the heatsink is providing firm, even contact across the surface
of the CPU. A possible solution to that question could be provided
by a wire or cable tie tether from one of the protruding ends of a heat
pipe, to some fixture in the PC chassis above the heatsink, so as
to provide a strain relief. Although tall, the heatsink is narrow enough that it does not obscure too much of the motherboard, so it can be installed onto the motherboard first, before installing this assembly into the chassis. This is also a good time to affix the heatsink fan. The result? Stable operation at 100% loading of both CPU cores was observed for 10 minutes, with the core temperatures reduced by 6-8°C, and the system temperature seen to be as much as 10°C lower during routine use. In addition to improved cooling the Silenx fans provided excellent airflow at substantially reduced noise levels. With a digital recorder laying on a carpeted floor, 8 inches from the front of the chassis, this MP3 sound clip shows the change in noise levels from the original configuration with Zalman cooler to the new configuration with the Thermalright cooler. The noise from the floor location of the PC to a sitting position approximately 3 feet away is a nice smooth hum, the bulk of the air noise likely coming from the graphics card stock fan. |
 |
|
 |
|
|
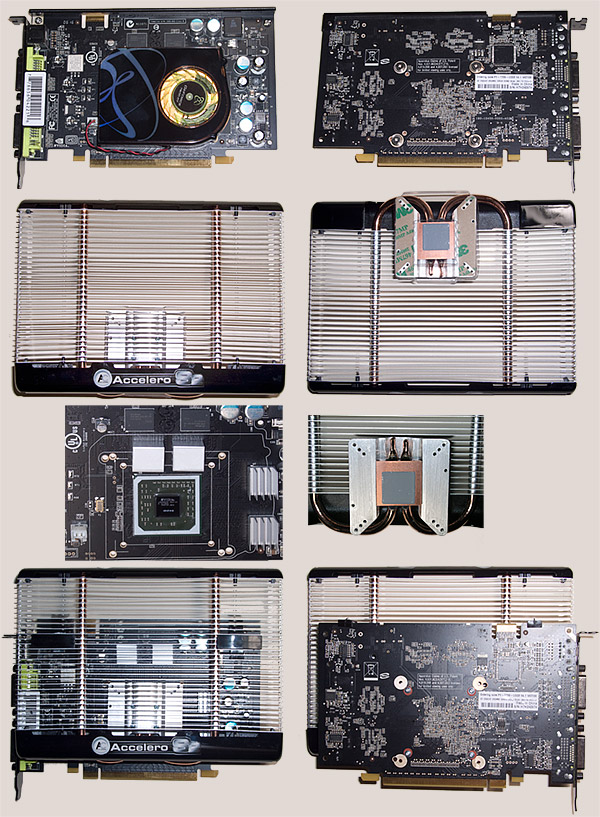
Since the date when I performed the heatsink/fan upgrades to my system, I've been very pleased by the performance and quietness, but I guess the "quiet bug" bit me and I've been wanting to see what more I could do to reduce the sound levels. The biggest offender was the fan on the XFX 7600GT graphics card, and the best solution for cooling and quieting that graphics card without a fan was found in the Arctic Cooling Accelero S2 passive cooler. Here is a photo showing the card, cooler, and the assembled pair. The only thing I overlooked was the depth of the cooler...once installed into the chassis, the cooler extended out enough that it interfered with the 120mm fan that I had installed on the side panel of my Gigabyte case. To get around that, if I find I still want a side-panel fan, I'll need to install a thinner 15mm fan. But even that idea is on hold for now, since another fan means potentially adding noise back into the system, which is all counter to my quieting goals. As is, I'm pretty happy with the results obtained.
|
|